How to Remove a Bathtub Drain

Removing Your Bathtub Drain at a Glance
- Step 1: Remove stopper
- Toe-touch stopper: Unscrew counterclockwise
- Push-pull stopper: Pull open and twist counterclockwise
- Lift and turn stopper: Unscrew counterclockwise and remove post
- Trip-lever stopper: Remove faceplate and pull hardware out
- Step 2: Unscrew bathtub drain
- Step 3: Clean drain opening
- Step 4: Reinstall or install new drain
Bathtub drains and their tub stopper counterparts can make a great pair. They work together nicely for all your bathtub filling and draining needs — until they don’t. Maybe it’s age, disuse, corrosion, leakiness or even a monster clog that can't be removed. But whatever the reason, there are times when this drain-stopper duo just calls it quits and requires a replacement.
This May Also Interest You: How to Remove a Bathtub Stopper
Follow this guide to remove your bathtub drain and stopper combo and install a new one.
Step 1: Remove Stopper
Before you can start your bathtub drain removal, you must first determine what type of bathtub drain stopper you have. This will help you figure out what type of removal technique will be most effective in your efforts to unscrew a bathtub drain. Each type of drain stopper has its own removal technique. Here are the most common stopper types:
Toe-Touch Stopper
The so-called toe-touch drain stopper opens and closes by pressing on the stopper with your toe. To remove this style of bathtub drain stopper, hold the base of the stopper while you turn the top cap counterclockwise, unscrewing it from the drain opening. In some instances, you may need a screwdriver to unscrew the base from the strainer.
Push-Pull Stopper
A push-pull drain stopper has a knob at the top that you push down to close it and pull up to open. To remove it, make sure it’s pulled open and twist counterclockwise until the stopper comes unscrewed from the drain opening.
Lift and Turn Stopper
Although it looks almost identical to the push-pull style, a lift-turn stopper is opened by lifting and turning the knob in different directions. To remove the stopper, unscrew the knob on the top of the drain and determine if there is a set screw underneath. If there is, you’ll need a small screwdriver or a hex key to unscrew it. If not, simply twist the whole stopper counterclockwise until it comes free from the mounting post. Then, remove the mounting post using pliers.
Trip-Lever Stopper
Perhaps the most unusual type of drain stopper, the trip-lever stopper requires a more complex removal technique. The stopper works by flipping a trip lever that controls a rocker arm on the overflow drain. To remove a trip-lever stopper, first unscrew the faceplate on the overflow drain. Once that’s been unscrewed, the entire trip-lever hardware should be able to be pulled out through the overflow drain.
How Do You Remove a Stuck Bathtub Drain Stopper?
If they haven’t been used in a long time, trip-lever stoppers sometimes become stuck in the closed position and cannot be removed. If this happens to you, remove the overflow drain cover and spray some WD-40 down the overflow drain toward the plunger. Then, use a pair of pliers to pull and remove the rocker arm and plunger from the pipe. Pliers can also be used to twist open other stopper types. If you’re having trouble gripping the stopper top, try putting a rag or washcloth over the stopper to give the pliers something to grab onto.
Step 2: Unscrew Bathtub Drain
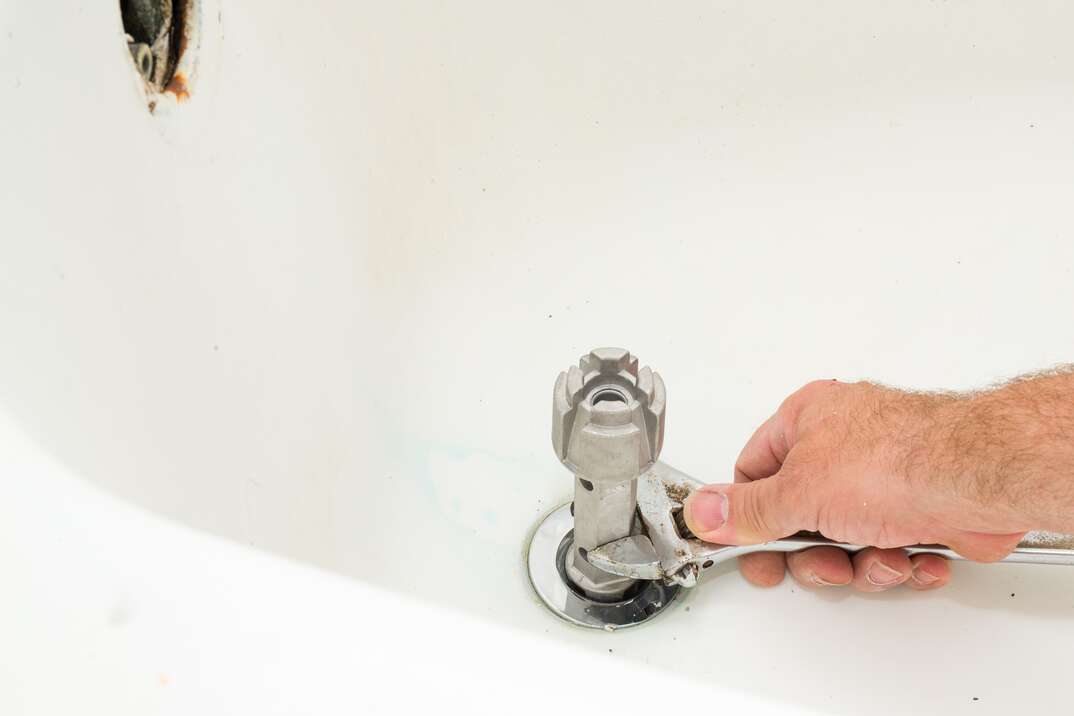
Once you’ve removed the drain stopper, use a scrub brush to make sure your drain is free of any gunk or hair that’s visible in the drain pipe. Take a putty knife or a scrub brush to wipe away any debris you can find. A clean drain opening will help you locate and remove the drain basket, which is sometimes called a drain flange. In order to remove the drain basket, you’ll need a special removal tool called a drain key as well as a pair of locking pliers or a wrench. Form fitted to the crosshairs on the drain basket, a drain key is specifically designed to remove tub drains without scratching or marring the finish on the tub.
Insert the drain key onto the crosshairs in the drain and clamp a wrench or pliers onto the key. Then, use the wrench to turn the drain key counterclockwise to unscrew the basket. Depending on what condition your drain is in, this can be a somewhat challenging task. Sometimes rust or calcium deposits can clog the threads and impede your ability to unscrew. Don’t be afraid to use extra force here; you just might need it.
How Do You Remove a Tub Drain Without a Crosshair?
Sometimes your drain’s crosshairs might be corroded or broken. In this case, a standard drain key won’t work. Instead, you’ll need a different tool called a tub drain extractor. Tub drain extractor tools inserted directly into the tub drain have helical knurls that grip the walls of the drain and, under the force of a wrench, turn it counterclockwise.
Again, older drains can often be a real pain to unscrew. Sometimes blowing warm air from a heat gun or a hairdryer can soften hardened plumber’s putty that might prevent you from unscrewing. After a few full counterclockwise rotations, the drain should be loose and be easier to unscrew.
More Related Articles:
- How to Install or Replace a Bathtub
- How Much Does It Cost to Replace or Install a Bathtub?
- Scrub-a-Dub-Dub: How to Clean Your Bathtub
- Got a Stopped-up Sink With a Sink Stopper? Pull Out All the Stops
- How Much Does It Cost to Install an Exhaust Fan in the Bathroom?
Step 3: Clean the Drain Opening
Once the drain has been removed, it’s important to make sure that the drain opening has been cleaned properly. Whether or not you’re installing a new drain or just re-installing the old one, a clean drain opening will prevent future leaks. Plus, the installation process will be easier if the drain’s clean. Use a blend of equal parts baking soda and white vinegar in and around the drain opening. This will clear away any rust or corrosion that’s built up around the threads of the drain opening, making for an easier installation.
Step 4: Install New Drain
Now, it’s time to install your new drain. Whether you’re installing a brand new drain or simply reinstalling the old one, you’ll need to use fresh plumber’s putty. First, create a long, snake-like roll of putty that’s about as thick as a pencil. Then, wrap the putty around the lip of the drain basket and start screwing the basket into the drain opening by twisting clockwise. Use the drain key to tighten it further.
After tightening, take a putty knife and clear away any excess putty that has seeped from the drain opening. With plumber’s putty, there’s no need to wait to test your drain, so you can go ahead and check for leaks and overall functionality. If all seems to be in working order, your new drain should be ready for use right away.


