Ever Cleaned Your Refrigerator Coils? Sure, We Believe You (But Here's How, Just in Case)

Cleaning Refrigerator Coils at a Glance
- Tools and materials: vacuum with special attachment, dust mask, small paintbrush or toothbrush, can of compressed air
- Step 1: Find fridge coils
- Step 2: Move fridge
- Step 3: Unplug fridge
- Step 4: Vacuum coils
- Step 5: Scrape and blow out stubborn dust, dirt and debris
- Step 6: Clean behind fridge and move fridge back into place
There’s a lot more that goes into maintaining a refrigerator than simply getting rid of the old food inside of it. A refrigerator is one of the most expensive investments you’ll make for your home, so you want to make sure you’re maintaining it properly to help increase its lifespan and maintain efficiency. Cleaning the refrigerator coils is a must-do maintenance task if you want it to be as energy-efficient as possible. Refrigerator coils help cool the fridge, and when dirt and debris are obstructing them, they can’t efficiently release the heat.
Watch It on TikTok: How to Clean Your Fridge Coils
While cleaning your refrigerator coils is a simple task that should be done, not many people actually do it. On average, you should be cleaning them at least once every six months. If you have pets or get a lot of dust in your home, you might want to consider doing this even more than usual since it will build up faster and could lead to expensive repairs down the road. According to Whirlpool, for maximum effectiveness, you should clean your coils every three months.
Clean Refrigerator Coils: 6 Steps
Follow this step-by-step guide to get those coils clean and to keep your fridge running efficiently.
Tools & Materials
Realistically you only need three tools for the job: a vacuum with a special attachment to be used for the coils, a dust mask, a small paintbrush or toothbrush, and potentially a can of compressed air.
1. Find the Refrigerator Coils
The first step in cleaning refrigerator coils is to find them. Up-to-date models will have the coils in the bottom of the fridge covered by a panel. Older models will have the coils exposed in the backside, near the bottom.
2. Move the Fridge
If the coils aren’t located on the bottom front of the fridge, they’re more than likely located at the back, which means you’ll need to move the fridge to get access to them. If your fridge has wheels, it’s as simple as pulling it outward. Otherwise, you might need to use some strength to slowly move the fridge out until the back is accessible, as shown here. You should always be careful when moving the fridge to avoid causing damage to your floor.
3. Unplug the Refrigerator
Before doing any type of maintenance to a refrigerator, you should always unplug the power. You never want to work on live systems, and although the chances of being electrocuted are low, it’s not a risk that you want to take.
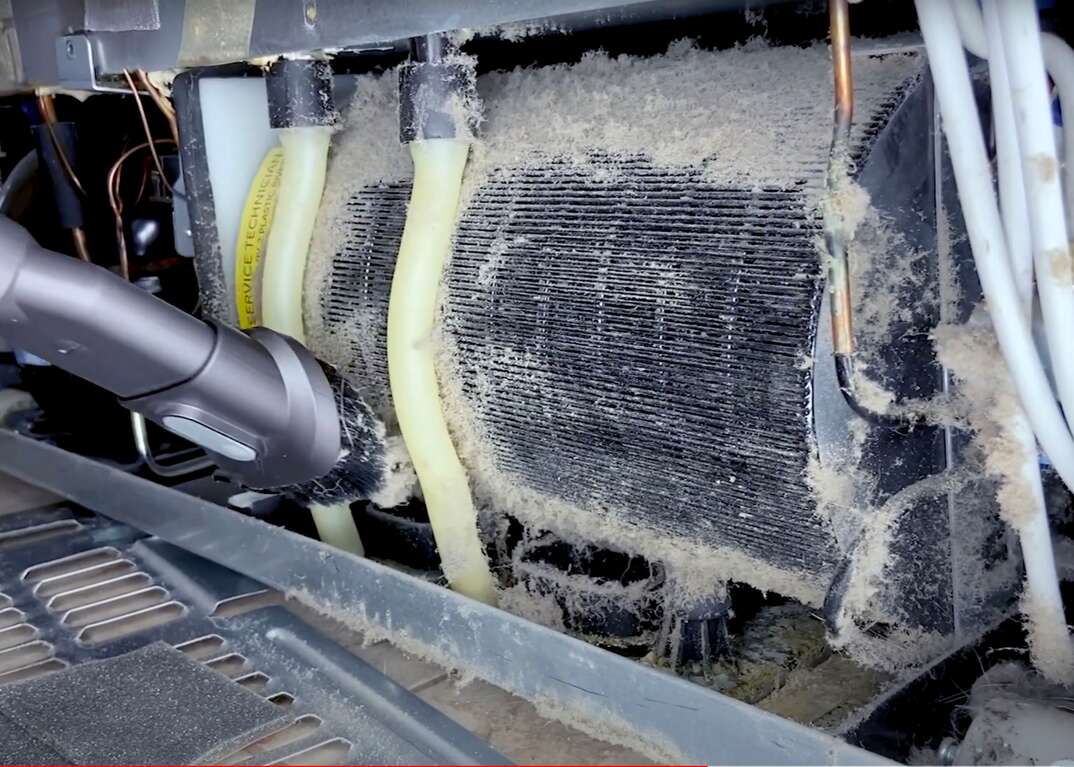
4. Vacuum the Coils
You can start vacuuming right away if the coils are exposed. Otherwise, you’ll need to remove a panel first. The panel is usually simple to remove, but if you start to struggle at this point, read the refrigerator’s manual instructions for removing it.
If it’s been a long time since you last cleaned out or haven’t cleaned it at all, you’ll find a significant buildup of dust and other debris. You’ll need to use a vacuum with a flat vacuum cleaner attachment to be able to reach the coils.
More Related Articles:
- Every Cost You Need to Know About With Refrigerator Repair
- Check Out the Average Cost to Service These Top 3 Refrigerator Brands
- Common Refrigerator Problems and How to Fix Them
- What Refrigerator Should I Buy for My Kitchen?
- How to Clean an Oven: Wipe Away Your Kitchen’s Dirty Secret in 8 Steps
5. Scrape ’n’ Spray
There will be times when certain dirt or debris are difficult to remove even with the vacuum attachment. Scrape these areas with a paintbrush or old toothbrush to remove any stubborn debris and get things as clean as possible.
Depending on the coils’ design, they might not all be reachable by a vacuum or a brush. This is where a can of compressed air can come in handy. You can use something as simple as WD-40 to blow the dust away. It should be noted that using an air duster can make things messy with dust, dirt and other debris flying everywhere. Despite that downside, using an air duster is effective at completely removing anything that can reduce the efficiency of the coils.
6. Move the Refrigerator Back Into Place
If you moved the refrigerator, be sure to clean the area around and underneath it before moving it back in place. This area isn’t always easily accessible for cleaning, so it’s best to take full advantage of this time. Similarly, when you move the refrigerator back, vacuum anything left behind after moving it. Once you finish vacuuming, plug the fridge back in, return it to its original place, and you’re all done.
Since we’re all home now more than ever, being prepared for unexpected home repairs with a plan from HomeServe is important. Having a plan in place gives you the peace of mind knowing that you can simply call our 24/7 repair hotline for covered breakdowns. See what plans are available in your neighborhood.


